Monday, November 14, 2016

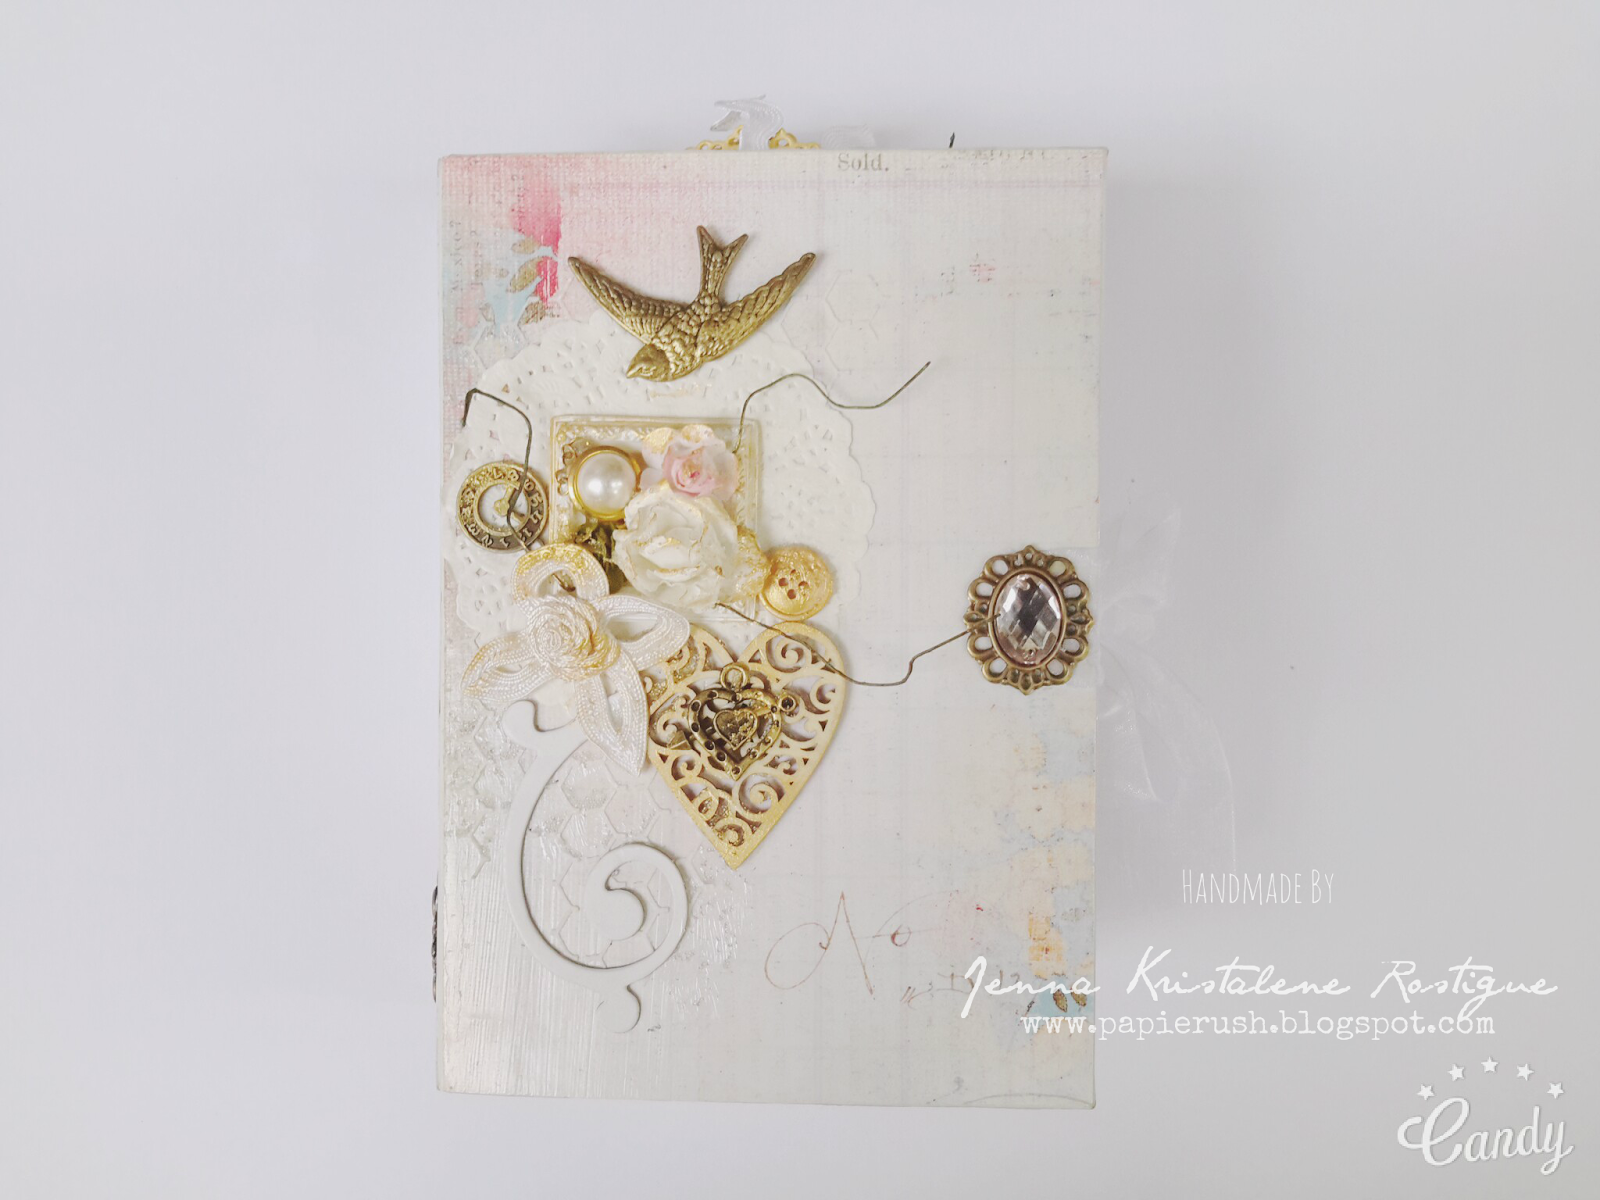
CARD# HPJ-2016-28: Vintage Birthday

Hi again! Here's a trishutter card that I made last month. It was supposed to be posted in time for World Cardmaking Day, but things happened. I was not able to participate online. 

Anyway, it's a mixed media card. I love how it turned out!


The card measures 4 1/4"x 6" when closed.


Like what I usually do with my trishutter cards, I use pretty papers for the various panels and little to no embellishments. I focused the embellishments on the front of the card. I just stamped some sentiments and image on the inside panels to add interest.


To add texture to the already pretty background, I stenciled with light molding paste and layered several die cuts. I then adhered the resin frame and put in the paper flowers. I brushed some gesso onto the surface of the embellishments. For the sentiment, I wrote on a black board paper using white pigment ink pen. And as a finishing touch, I stamped some text on the background.


I love this particular trishutter card! It's so pretty! I wish I could keep it for myself, but it has to go somewhere. I hope that whoever gets to take it home would love and cherish it like I do. 

That was that! Thanks for looking! Up next is another mixed media card. This time, it's a top fold card. I hope you check it out. Thanks again!


MATERIALS AND TOOLS USED: Bevania Splendorgel Board Paper White, Eno Greeting 12"x12" paper pad die cuts, Heidi Swapp 6"x6" paper pad Mixed Media, paper flowers, Eno Greeting Resin Embellishments, Golden Light Molding Paste, The Crafter's Workshop Stencil Mini Tile Texture, Pebeo Gesso, Kaisercraft Clear Stamps Perfume, Bo Bunny Clear Stamps Sentiments, Heidi Swapp Mixed Media Clear Stamps Script, Ranger Archival Ink Jet Black, Uniball Signo Broad Pigment Ink 0.7, Stanley Glue Gun

Sunday, July 31, 2016

CANVAS# HPJ-2016-01: Happiness

Hello! I am so sorry I am bombarding my blog with late posts. Heh. Now is the right time to post them since my internet connection had been steady for two hours now. Woohoo! I am just so frustrated every time I try to update my SNS. It takes forever to upload anything. Ugh.

So, how are you? I haven't made anything much for the past few weeks and I don't feel good about it. I need to get my artsy fartsy groove back on and work on something, a canvas, before I get mad thinking of layouts and color schemes and what not but not actually applying them in real life. Ach. 

Two weeks ago, I couldn't let go of this thought, of using purple and blue and green for a mixed media project. I still have one canvas left but I wanted something rectangular, not a square. I went to Deovir to buy two 8"x10" canvases and a purple acrylic paint. I started on the canvas in the wee hours of the morning. Since I don't have any photos of myself or of recent group shots printed, I used one of the post cards that I bought at Landmark in one of my shopping sprees ages ago. It might not have turned out to be what I originally pictured out, but I'm happy with it just the same. I want to work on the other canvas soon. Without further ado, here is what it looks like.

 I employed the techniques I learned from Elena Morgun. The process is similar with my Remember canvas from last August. 


I coated the canvas with gesso first (even though it is already primed). I mixed a part of Liquid Pearls (Peacock) with gesso and applied the mixture on the canvas. I did the same with the purple metallic acrylic paint.  I then sponged some distress ink all over the canvas and inked the edges with Black Soot. I did some stenciling with molding paste for the bricks.


I adhered the post card into the canvas and added the embellishments one after the other. I stamped on the canvas and brushed micro pearls in some areas. I glazed the paper flowers with acrylic paint and affixed the crystals for the final touch.


I wanted to add bigger metal charms, but realized that I was only able to buy small ones from my last trip to Villalobos St. [Sigh.] I wish I went to the other shops and looked for them. Well, next time I'll definitely get a horde of them!
 The picture on the post card included several delicious colors. Aside from purple, blue and green, I also made use of orange and pink elements to make the canvas more interesting.
So how did you find this project? I hope you liked it as much as I do. It screams 'HAPPINESS', like when I craft and make pretty little things. I always lose myself into my work. The fulfillment I get during the process and after is just overwhelming. I just want to soar up high and share what I have made. I wish to make more soon. Thanks for stopping by today! Have a great weekend!


MATERIALS AND TOOLS USED: Conda Stretched Canvas 8"x10", Postcard, Rosie's Studio Sticker Quotes, Eno Greeting Wooden and Resin Embellishments, paper flowers, metal charms, self-adhesive crystals, Prima Marketing Clear Stamps Vintage Vanity, Heidi Swapp Mixed Media Clear Stamps Script, Ranger Archival Ink, The Crafter's Workshop Stencil Mini Bricks, Golden Molding Paste, Pebeo Gesso, FolkArt Metallic Paint Amthyst, Pearl White and Blue Topaz, Ranger Distress Ink Black Soot and Bundled Sage, Ranger Liquid Pearls Peacock, Mod Podge Matte, micro pearls

CARD# HPJ-2016-15: Pink Birthday

Hi again! Here's the second card I've mentioned in the previous post. I hope you like it.


For the belly band, I just stamped on the diecut and adhered the embellishments. Afterwards, I glazed the flowers with metallic acrylic paint.


I punched a strip of white board paper with one of  my Martha Stewart Edge Punches and adhered it to the flaps at the opening of the box.


As was with the other box cards, I cut several die cuts from pink patterned papers for the messages. The finished project is also so cute I love it!


MATERIALS AND TOOLS USED: Bevania Splendorgel Board Paper Ivory and White, Best of Studio Calico 12"x12" paper pad, Rosie's Studio Sticker Quotes, Eno Greeting Wooden Embellishment, paper flowers, beads, pearls, Heidi Swapp Mixed Media Clear Stamps Script, FolkArt Metallic Acrylic Paint Pearl White, Martha Stewart Edge Punch Doily Lace, Spellbinders Nestabilities Labels 34 , Cuttlebug Machine V2

Monday, May 16, 2016

CARD# HPJ-2016-13: It's A Girl!

Hi! This is the last post I have for today. I have several other projects which I made in the past few weeks, but I was not able to take photos of them before giving them to their recipients. Hmf.

Okay. So this last one is a Joy Fold Card. It is similar to the one I made for Ate Nadia's mom.

By the way, I made this for a colleague who is going to have a baby girl soon. We had a surprise baby shower for her at work and we prepared a little gift for her. I included this card in the package. Heh.

I mentioned that it is similar to the one above, but the color palette is different as well as the edge punch that I used. Here is what I came up with for Ate Maggie's card.


I stamped on a diecut to make the focal point of the card. I added paper flowers, beads and crystals on the front of the card to make it more interesting. I glazed the paper flowers with white metallic acrylic paint afterwards.


I had stamped a sentiment on the inner flap of the card.


I love this card! I think I'm going to make another one for a colleague's birthday this June. Hmn. I'll just make it purple and of course I will use a different edge punch again. Yay! If I am still awake this afternoon, I will make the base so it would be easier to put everything together later on. I might just do that to save time. Anyway, this is the last post for today. I was supposed to update my banner and make some changes to my blog template, but I will do them some other time. Thanks for stopping by! Till the next post!


MATERIALS AND TOOLS USED: Bevania Splendorgel Board Paper White, Graphic 45 8x8 paper pad Secret Garden, My Mind's Eye Lost & Found 6x6 paper pad Blush , paper flowers, beads, pearls, self-adhesive crystals, Kaisercraft Clear Stamps Bundle of Joy and Little One, Ranger Archival Ink Jet Black and Sepia, Ranger Distress Ink Mini Tattered Rose and Antique Linen, FolkArt Metallic Acrylic Paint Pearl White, Martha Stewart Edge Punch Doily Lace, Spellbinders Nestabilities Labels 34, Cuttlebug Machine V2

Monday, December 28, 2015

DT PROJECT FOR BEE HAPPY CRAFTS: Wedded Bliss

Hi there! I have wanted to show you the mini that I made for my friends who got married last November 2nd, but I had been so busy. I don't like how the box turned out, but I love the mini. I actually want it for myself. Heh.


Anyway, I made a walk through video of it (Thanks to my sister who recorded the video while I flipped through the pages.) You can find it on my Flickr account.

Just like the one that I made for Ate Nadia (If you haven't seen it, you can check it here.). I employed the same techniques that Cathy McGrath utilized on her video tutorial. I got to use the Martha Stewart Edge Punch from the package! The edges of the pages are so pretty because of it. I still followed Cathy's ideas on how to make the pages interactive, but I decorated mine to be more like me. I used light molding paste which I must say is such a cool product. It is very light yet it builds texture and dimension. Awesome!


For the cover, I cut a piece of chipboard and adhered a length of thick double sided tape on the folds and covered the surface with tissuestock. I then coated it with Modge Podge. After drying, I covered the base with one of my wrapping papers (the white side up) and again coated the whole thing with Modge Podge. Then I added the patterned papers and brushed another coat of Modge Podge. You see there are a lot of layers of paper and Modge Podge.


I did not embellish the front heavily like I usually do with my mixed media projects.

Instead of decorating the pages with the pockets like Cathy did, I left them alone. I placed embellishments on the pages with photo mattes. Some of the embellishments were made from shrink plastic (the small love gears) left over from the first package I received for the Design Team.


I made photo matte inserts out of the pale cream cardstock and stamped on them using distress ink. For the pull tab, I made several dieccuts using the Die-namics Mini Doilies dies which also came in the first DT package.

There are tags on all the pages. They are from the paper pad that I used for the mini. I just tied lace and rickracks on all of them to add more interest.


Before we go to the box, there is one other part of the mini that I need to talk about. Okay. That would be the detachable charm that goes on the spine of the mini. You have seen it a couple of times in my previous projects. It is one of the staples of minis. I put together several metal charms and beads from my stash to make it.


I haven't met with the couple after the wedding ceremony so I haven't given this yet. I am still thinking of changing the box because I really do not like how it turned out. I haven't made another one yet since I cannot find the right box. Tsk. I thought I had found it, but when I came home and saw the old box, I realized that it was too big. Hmf. Oh well, I will just try something else.

By the way, the photo above is how I was to package the gift. I will cover the box with white organza. That is, if I have the right box. Tsk. I will make an update here what the final packaging would be. I hope you visit my blog from time to time. Thank you for stopping by today!

MATERIALS AND TOOLS USED: Paper bags, Elit Board Paper Vellum Pale Cream, Chipboard, Eno Greeting Paper Pad 12"x12", Daisy D's 12"x12", Martha Stewart Edge Punch Floral Lace, Bo Bunny Clear Stamps It Is Written, Kaisercraft Clear Stamps Botanical Odyssey, Ranger Archival Ink Jet Black, Distress Ink Mini Bundled Sage, Iced Spruce, Crushed Olive, Tattered Rose, Worn Lipstick and Ripe Persimmon, Eno Greeting Resin and Wood Embellishments, Eno Greeting 3D embellishments, Rouge de garance Chipboard Embellishments, metal charms, shrink plastic embellishments, self-adhesive crystals, pearls, beads, paper flowers, paper doily, organza ribbon, lace trimmings, rick racks, Reeves Poster Color Gold, Elmer's White Glue, Stanley Glue Gun, Ranger Heat It Tool, Spellbinders Nestabilities Captivating Squares and Fleur de Lis Squares, Die-namics Mini Doily Circles, Spellbinders Shapeabilities D-Lites Fancy Framed Tags One, Cuttlebug Machine V2

Monday, October 12, 2015

DT PROJECT FOR BEE HAPPY CRAFTS: Tying the Knot


Hi there! How are you doing? Here is another wedding card I made for BHC DT last month. I just didn't get to post it on time. I'm so sorry for that. There are still a couple of projects that I haven't uploaded which I hope I could show you soon. 

So, let's look more into the card. If you have seen my previous works, you probably saw something similar. I've made two of these before, but they are slightly different. The first one was square while the other one was rectangular and it was the front part of a popup book card.


When I learned that I would be getting a Cottage Cutz Trellis With Vine Die for the month of September, I automatically thought of making a recessed frame card. I already pictured out how to arrange the die cuts on the card. Since I was into shabby chic last month, I used the more subtle designer papers from the Dear Lizzy Polka Dot Party 6x6 paper pad. Here is what I came up with.

I made the base of the card (A2) following the guide written by Malin  on her blog cri-kee76. I inked all the edges using Walnut Stain. I cut the designer paper to fit into the frame and distressed the edges. I then inked it.

Before adding the die cuts, I covered the center of the card with another designer paper from the paper pad and adhered a die cut with a stamped sentiment. Then I glued the trellis with the vines. I added silk and paper flowers from my stash as well as some beads and silk leaves. After gluing down all the embellishments, I brushed the surface of the flowers with gesso then painted it with metallic acrylic. It is the same technique that I used on the card I made last August. 


On the inside of the card, I made a little pocket where I could tuck a gift card for the bride and groom.  I just cut a piece of white cardstock and punched the top part. (I originally used Arch Lattice, but when my package came in, I changed it with Doily Lace. It is much prettier this way.)  I then covered the 'unpunched' area with distressed and inked patterned paper. I stamped some more sentiments and I was done. 

It was another fun project. I love how it turned out. I will be making a paper bag mini to go with it later on. I will be giving them to my buddy (from my college org) on her wedding this November. 

So that was that. Thanks for looking today! Have a great week!^-^

MATERIALS AND TOOLS USED: Bevania Splendorgel Board Paper White, Dear Lizzy Polka Dot Party 6x6 paper pad, Eno Greeting 3D Stickers, paper flowers, silk leaves and flowers, beads, pearl, self-adhesive pearls, Ranger Distress Ink Walnut Stain, Ranger Archival Ink Jet Black, Kaisercraft Clear Stamps Ever After, FolkArt Metallic Acrylic Pearl White, Stanley Glue Gun, foam tape, Martha Stewart Edge Punch Doily Lace, Spellbinders Nestabilities Captivating Squares, Cuttlebug Machine V2