Monday, May 16, 2016

CARD# HPJ-2016-13: It's A Girl!

Hi! This is the last post I have for today. I have several other projects which I made in the past few weeks, but I was not able to take photos of them before giving them to their recipients. Hmf.

Okay. So this last one is a Joy Fold Card. It is similar to the one I made for Ate Nadia's mom.

By the way, I made this for a colleague who is going to have a baby girl soon. We had a surprise baby shower for her at work and we prepared a little gift for her. I included this card in the package. Heh.

I mentioned that it is similar to the one above, but the color palette is different as well as the edge punch that I used. Here is what I came up with for Ate Maggie's card.


I stamped on a diecut to make the focal point of the card. I added paper flowers, beads and crystals on the front of the card to make it more interesting. I glazed the paper flowers with white metallic acrylic paint afterwards.


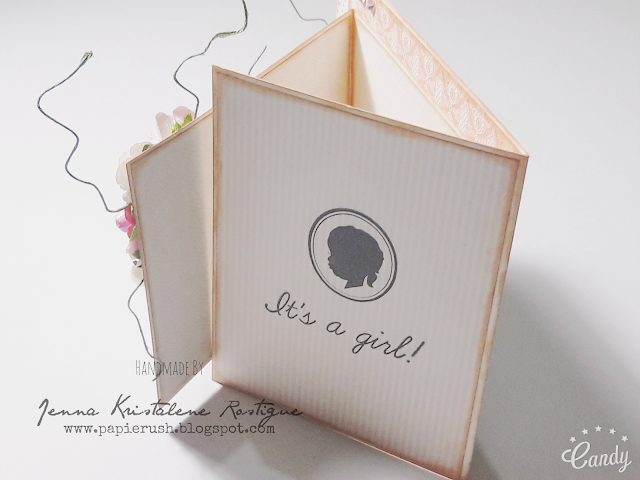
I had stamped a sentiment on the inner flap of the card.


I love this card! I think I'm going to make another one for a colleague's birthday this June. Hmn. I'll just make it purple and of course I will use a different edge punch again. Yay! If I am still awake this afternoon, I will make the base so it would be easier to put everything together later on. I might just do that to save time. Anyway, this is the last post for today. I was supposed to update my banner and make some changes to my blog template, but I will do them some other time. Thanks for stopping by! Till the next post!


MATERIALS AND TOOLS USED: Bevania Splendorgel Board Paper White, Graphic 45 8x8 paper pad Secret Garden, My Mind's Eye Lost & Found 6x6 paper pad Blush , paper flowers, beads, pearls, self-adhesive crystals, Kaisercraft Clear Stamps Bundle of Joy and Little One, Ranger Archival Ink Jet Black and Sepia, Ranger Distress Ink Mini Tattered Rose and Antique Linen, FolkArt Metallic Acrylic Paint Pearl White, Martha Stewart Edge Punch Doily Lace, Spellbinders Nestabilities Labels 34, Cuttlebug Machine V2

CARD# HPJ-2016-12: Congratulations!

Hi again! I'm almost done with my catch up posts. Heh. There is just one left after this. 

So, what we have here is an inverted Diamond Fold Card. If you are interested to learn how to make the fold, you can find a video tutorial of Beate Johns for Splitcoaststampers here


I made a belly band to close the card and at the same time, to hold the focal point of the card.

I finally made a pet-themed card for Nessie! Woohoo!


This is what it looks like when the card is opened.


This card is really easy to make. It just looks a bit complicated, but you can actually make it in a few minutes. 

I hope you like it. Thanks for looking today! 


MATERIALS AND TOOLS USED: All About Scrapbooking 12x12 patterned papers, Darice Core'dinations Premium Cardstock Pure Chocolate, organza ribbon, self-adhesive crystals, Kaisercraft Clear Stamps Little One, Spellbinders Nestabilities Labels One, Cuttlebug Machine V2 

CARD# HPJ-2016-11: Life's Journey

Hello! Here's the third card I made for colleagues who transferred to other teams.

It is a vertical Criss Cross Card.


I stamped stitches on the designer papers. I also stamped the main image and fussy cut it and adhered it onto a diecut with a chipboard underneath for added dimension. I made a small tag using one of the Nellie's Choice straight tags dies and stamped the sentiment on it.


I made inserts for the card. We wrote our messages here. It isn't easy to pull them out without a pull tab so I made two for each insert. They are diecuts using the Die-namics Mini Doilies die.


At the back of the inserts, I stamped some images and sentiments instead of adhering patterned paper. I love the dream catcher! It's from Rosie's Studio.


That was that. The card was easy and fun to make. By the way, if you would like to make one yourself, you can find a photo tutorial by Beate Johns of Splitcoaststampers here or a video tutorial here. Have fun creating! Thanks for stopping by today! Have a great week!


MATERIALS AND TOOLS USED: Bevania Splendorgel Board Paper White, Rives Board Paper Tradition Black, Moods Board Paper Storm Grey, Elit Board Paper Vellum White, Best of Studio Calico 12x12 paper pad, self-adhesive crystals, Inkadinkado Clear Stamps Inspirational Lift, Rosie's Studio Clear Stamps, Bo Bunny Clear Stamps Stitches, Ranger Archival Ink Jet Black and Yellow Ochre, Spellbinders Nestabilities Pierced Circles, Die-namics Mini Doily Circles, Cuttlebug Machine V2

CARD# HPJ-2016-10: Shine On

Hi again! Here is another 'Thank You' card for another colleague who transferred to a different team.


The card measures 4 1/2" x  3/4".


MATERIALS AND TOOLS USED: Bevania Splendorgel White, Prestige Board Paper Zulu Black, Rives Board Paper Tradition Black, Rosie's Studio 6x6 paper pad Chalk Essentials, Rosie's Studio Diecuts, self-adhesive crystals, Signo Broad Pigment Ink 0.7 White, Nellie's Choice Multi Frame Dies Straight Tags, Spellbinders Nestabilities Labels 4, Cuttlebug Machine V2, hole punch

CARD# HPJ-2016-09: Trishutter Thank You

Hello! Here is a trishutter card I made for a colleague. It is a sort of Thank You card for being a part of the team. She is actually moving to another position which means she is leaving our team to join another. It is not farewell though since we will still see her around. So here is the card.


It measures 4 1/4" x 6" when closed.

I used my new supplies to make this. It would have been gorgeous if I have not made a huge mistake on the front of the card. Geez. I don't know what I was thinking. I put a lot of micro pearls on the flowers and then brushed a liberal amount of a different color onto the surroundings. Gad. I should have stopped with the flowers. I even used soft gloss gel so it has that shiny effect making it so noticeable. Eek! I can't re-do it so I'll just bear with it. Hmf.


I didn't put in much embellishment on the inner panels since it would be hard to close the card what with the center having an accordion card for the messages.

Sorry for the low quality photos. I took them indoors (and at night) so they are not that clear.

Thank you for looking today!


MATERIALS AND TOOLS USED: bevania Splendorgel White, Elit Vellum Board Paper White, Heidi Swapp 6x6 paper pad Mixed Media, Eno Greeting Diecuts, paper flowers, rose buds, beads, micro pearls, ribbon, metal charms, stamens, Eno Greeting Wood Embellishments, Heidi Swapp Clear Stamps Script, Ranger Archival Ink Jet Black, Ranger Embossing Ink, Ranger Embossing Powder Frosted Crystal, Golden Light Molding Paste, The Crafters Workshop Stencil Mini Art Is, Mini Chicken Wire Reversed and Mini Brocade, Ranger Liuid Pearls Mint Green and Petal Pink, Golden Soft Gloss Gel, Ranger Heat It Tool, Stanley Glue Gun, cutter

Sunday, May 15, 2016

APRIL GOODIES

Hello there! I just wanted to share the pretty little things I got from Landmark last month.

The first set is a bunch of chipboard alphas from Eno Greeting. I just love that Landmark is carrying more Eno Greeting products. Yay!


I also bought a couple of diecuts.


 And lastly, I purchased some cute notebooks and notepads. The only thing I can say is that I was fooled into buying the white one. I thought it had no lines, but apparently, it had. I was quite disappointed when I opened it and saw the lines. Tsk. So much for thinking of making this my new journal. Hmf. Anyway, they are all so cute.