Monday, February 27, 2017

CARD# HPJ-2017-2: Enjoy

Hi again! This second box card is better than the previous one. Heh. I made this for one of my colleagues, Espie. (I made a criss cross card for her birthday last year.)

I just made it like I normally do when I work on mixed media box cards except that I did not use modling paste. I only layered inks. Here is what it looks like.


I thought against glazing the embellishments.  I made do with just the layering of inks and embellishments. I hope you like it. Thanks for looking!


MATERIALS AND TOOLS USED: Bevania Splendorgel Board Paper Ivy, Rives Board Paper Tradition Black, 12"x12" patterned paper, Eno Greeting Resin Embellishment, paper flowers, beads, Ranger Distress Ink Mini Peacock Feathers, StazOn Midi Ink Midnight Blue, Kaisercraft Clear Stamps Honeycomb and Boutique, Uni Ball Signo Broad White, Martha Stewart Edge Punch Doily Lace, Spellbinders Nestabilities Labels One, Cuttlebug Machine V2 

CANVAS # HPJ-2017-02: Soar

Hi! Here is the second canvas I made last January. It is a canvas version of my art journal birthday spread. I still haven't gotten over my blue and green phase.

Anyway, here it is. It's a 9"x12" canvas.


I inked the canvas with distress ink pad. I  then stenciled with molding paste. After drying, I stamped several texts and scripts. I used glimmer mist to add more color to the background and splattered some of it. I adhered the sentiment which I handwrote on pieces of board paper at the top part of the canvas. I adhered the framed photo and the wooden wings next.

That was that. It was easy to make, but it took some time for everything to dry. Thanks for looking today! I hope you check on my other posts. 


MATERIALS AND TOOLS USED: Conda Stretched Canvas 9"x12", Ranger Distress Ink Mini Ebergreen Bough, Golden Molding Paste, The Crafter's Workshop Stencil Mini Chickenwire Reversed, Tattered Angels Glimmer Mist Bahama Blue and Cinder, Ranger Archival Ink Jet Black, Heidi Swapp Mixed Media Clear Stamp Script, Kaisercraft Clear Stamps Boutique, Prima Marketing Clear Stamps Vintage Vanity Music, Rives Board Paper Tradition Black, Uni Ball Signo Broad White, Eno Greeting resin embellishment and wooden embellishment, printed photo

Monday, September 14, 2015

DT PROJECT FOR BEE HAPPY CRAFTS: Upcycled Bottles

Hi there! Welcome to today's post. As mentioned in the title, the project that I worked on is a set of bottles. I altered them using a variety of materials, but I mostly used burlap from the DCWV Burlap Stack that came with the package. 
One of the perks of working for a food company is the numerous freebies. Last Friday, we were given nine Bear Brand Sterilized Milk 200mL and a box of NESCAFÉ Smoovlatte (24 bottles). 

While drinking the Smoovlatte, I thought of dressing up the empty bottle. It is quite pretty. I have already gathered a couple of other bottles which I found at home by that time and since I was going to alter several bottles, why not include one more. So there. 

The other bottles originally contained olive oil and iced tea. (For the life of me I can't remember the brand of the other olive oil. The label was red. Ach.)


Anyway, let me show you what I came up with. First up is the altered bottle of Tazo Iced Tea.


1. Love

I applied several coats of gesso to the exterior of the bottle. After drying, I stenciled on the surface using molding paste. (It was not a brilliant idea. It was rather difficult to stencil on it since the surface is curved. I just basically smudged what little I was able to put on it.) I coated the bottle with distress crackle paint (Rock Candy) then I used my Ranger Heat It Craft Tool to hasten the drying time. I then sponged distress ink (Brushed Corduroy) over the dried crackle paint to emphasize the cracks. 


Now that the base was done, I proceeded with the decoration. Before starting with the bottle, I made a burlap flower using the Tim Holtz Alterations Dies Tattered Florals. It was the focal point of the project. I added a couple of paper and silk flowers, beads and whatnot for more dimension. I didn't intend to use the same color scheme for the background, but as I was moving along with the project, I realized that I picked out turquoise and blue again. I was thinking more in the line of blue and orange when I started making it, but it turned out different at the middle. Sorry for that. I still have a blue and green hang over. So, just like my previous mixed media canvas, I stamped around the embellishments, added micro pearls and brushed metallic paints over the various elements.  As a finishing touch, I affixed a length of lace trimming at the top of the bottle.


The opening is rather small, but I could use it to store my knitting needles.

MATERIALS AND TOOLS USED: Empty bottle of Tazo Iced Tea, DCWV Burlap Sheets 12"x12", lace trimming, Eno Greeting Wooden Embellishments, All About Scrapbooking wooden embellishments, Eno Greeting Sticker Sheet, metal charms, brad, beads, self-adhesive crystals, micro pearls, Rouge de garance Chipboard Embellishments Passiflore and Valse, Reeve's Gesso, Golden Molding Paste, The Crafter's Workshop Stencil Mini Art Is and Mini Swiss Dots, Ranger Distress Crackle Paint Rock Candy, Ranger Distress Ink Mini Brushed Corduroy, Modge Podge Classic Matte, Ranger Liquid Pearls Cantaloupe and Peacock, FolkArt Metallic Acrylic Colour Blue Topaz, Ranger Archival Ink Jet Black, Prima Marketing Clear Stamps Vintage Vanity

2. Shabby Smoovlatte


The second one was an empty Smoovlatte bottle. As I have said earlier, the bottle is small and pretty. It could be used as a mini vase. You can put in some handmade flowers made through the We R Memory Keepers Flower Punch Board. You can make several of these in a short time.


I just cut some burlap that could go around the bottom part of the bottle and adhered it with hot glue. I added lace trimming to the edges and placed a lace flower which I made a few months back when I was trying to figure out what to use on a friend's wedding invitation. I wrapped a chain on the upper part of the bottle to make it more interesting. Also, I tied a thin lace and attached a dragonfly charm on the bough.


MATERIALS AND TOOLS USED: Empty bottle of NESCAFÉ Smoovlatte (190mL), DCWV Burlap Stack 12"x12", lace trimmings, chain, pearls, beads, jump rings, metal charm, Stanley Glue Gun

There are two more bottles that I am currently working on. I will be adding the photos tomorrow and I will be uploading my other DT project-a shabby chic wedding card. I hope  you drop by again tomorrow. Thanks for looking today! Have a great week!

Monday, August 31, 2015

DT PROJECT FOR BEE HAPPY CRAFTS: Special Day

Hi again! What I am going to share to you on this post is the last project I made for the month of August as a part of the Bee Happy Crafts DT.  It is a teeny weeny card with a mason jar embellishment.


 The card measures 4"x4".


There was an embossing folder in the package that was sent to me by BHC. It was a Darice mason jar. I only have three embossing folders in my stash, but I haven’t used them that much. When I got the item, I thought I would make a card with it. By card it meant embossing a piece of cardstock. Well, I worked with the other supplies first and came across shrink plastic. As I have said in a previous post, I am still new to this material and I haven’t done much exploring yet. It got me thinking of embossing the shrink plastic and stamping on it. The first one that I made didn’t turn out good.


 I smudged ink all over the shrink plastic!


Anyhow, I tried making another one and it look a lot better. I don’t advise using pigment ink though because it does not adhere onto the shrink plastic well. If you touch the inked part it would get smeared. What I did on my shrunk embellishment was to adhere the inked side onto the chipboard so it would stay intact.


Assembling the card was fairly quick since I just used some elements from previous projects like the card base, the die cut and the distressed circle. I just had to add the sentiment and embellishments. 


By the way, I brushed metallic acrylic paint over the elements. I love the FolkArt Pearl White Paint. The coating was very fine. It was translucent and it leaves the coated part shimmery. It is like adding glaze to your work, but this particular paint is not that overpowering. It is very light as it is. I totally love it! You may be sure to see more of it in the next projects for BHC since my theme would be 'Shabby September'. I hope you stop by again some time to catch them.

On the other hand, August will draw to a close in a couple of hours. I have some other projects that I have not posted yet which are part of the month of August. I would probably put them up this week, but they would already be under September (on the blog). [Sigh.] The Christmas season is here and my Christmas list is a bit long this year so I would also start working on my Holiday cards. Watch out for them as well.

Okay. I would really end it here. I am soooo sleepy. I need to doze of for a while before going to work later. Thanks for looking today! Have a great week!

MATERIALS AND TOOLS USED: Bevania Splendorgel Board Paper White, Patterned Paper from The Stampers' Sampler Magazine, My Mind's Eye 6x6 paper pad Away We Go, My Mind's Eye Chipboard Embellishments, lace trimming, paper and silk flowers, self-adhesive crystals, string, Kaisercraft Clear Stamps Butterflies, Bo Bunny Clear Stamps Flourishes and Such, Ranger Archival Ink Jet Black, ColorBox Cat's Eye Queue Pigment Ink Turquoise, FolkArt Metallic Acrylic Paint Pearl White, Ranger Heat It Craft Tool, Stanley Glue Gun, Darice Embossing Folder Mason Jar, Spellbinders Nestabilities A2 Card Creator Die Tranquil Moments, Cuttlebug Machine V2

Wednesday, August 26, 2015

DT PROJECT FOR BEE HAPPY CRAFTS: Remember

Hello guys and gals! I’m so sorry for the late post. I intended to show you another project for Bee Happy Crafts DT yesterday, but I dozed off an hour after getting home from work. Tsk. Here it is.
I was supposed to make a different project over the weekend, but I couldn't take my mind off a green and blue based mixed media canvas. So, I worked on it first. It was inspired by a project Elena Morgun made for Finnabair CT. You can find the video on her Youtube channel Elena Morgun. I tried the techniques she used and I was really happy about it. I didn't do some parts from her video tutorial since I didn't have the supplies, but I think it still looks fine. What do you think? (Don't mind my photo. Since I couldn't let go of the idea of starting the canvas, I just chose a picture from the very few printed ones that I have on hand. Excuse my face. Heh.)


I painted the chipboard with Burnt Umber acrylic colour.
If you have or will check out Elena's video, she used soft gloss gel and silks to paint the base. Since I didn't have those, I used gesso and liquid pearls and then I sponged some olive ink from my ColorBox pigment ink pad over the surface. I cut pieces of designer papers from the Studio Calico sampler pack and adhered them onto the canvas with Modge Podge. I adhered a 3R photo (3.5" x 5") onto a slightly bigger cardstock. Before gluing it onto a thick chipboard, I placed a journaling card at the back of the photo mat. I cut out a sentiment from another journaling card. I then added the embellishments and stamped here and there. I brushed watered-down liquid pearls and metallic acrylic paint over a couple areas of the canvas including the top of the embellishments. I also added some micro pearls using Modge Podge. I splattered black acrylic paint onto the canvas and smudged some paint on the edges with my finger.
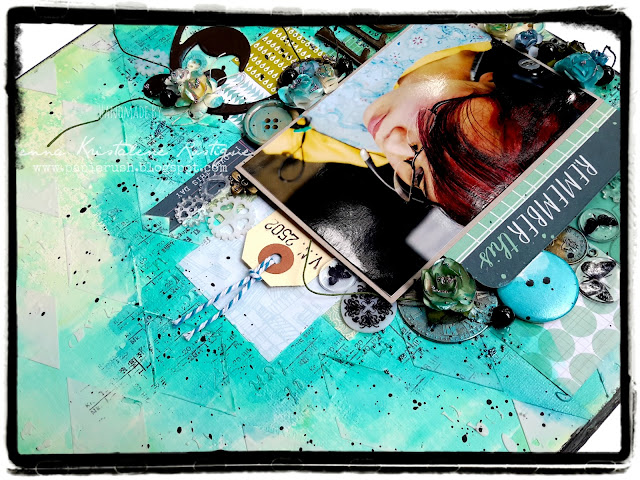


As a finishing touch, I added the embellishments that I made using shrink plastic. It's just so amazing looking at the little cogs and gears that came about by heating die cuts out of shrink plastic. They are just so cool! It was fun making them. I will definitely make some more. You will most probably see them on the current project that I am working on. I'm so excited. If only I could finish it now I could show you how it looks, but I would need another day or two to complete it.

So that was that—another mixed media canvas done. I hope to finish the mini that I am currently working on. Do stop by in a few days to check it out. Thank you for looking today!

MATERIALS AND TOOLS USED: Conda 12" x 12" Canvas, Moods Board Paper Storm Gray, Best of Studio Calico Sampler Pack, Ink Rose Albums Made Easy Journaling Cards, tag, Rouge de garance chipboard embellishments Passiflore, American Crafts Thickers, paper flowers, metal charms, pearls, buttons, string, baker's twine, shrink plastic, Pebeo Acrylic Colour Burnt Umber, Ranger Liquid Pearls Peacock, Mint Green and Petal Pink, FolkArt Metallic Acrylic Colour Blue Topaz, Reeves Acrylic Paint Mars Black, Reeves Gesso, Modge Podge Classic Matte, Elmer's White Glue, micro pearls, Ranger Archival Ink Jet Black, ColorBox Cat's Eye Queue Pigment Ink Pad Olive, Kaisercraft Clear Stamps Butterfly and Botanical Odyssey, Prima Marketing Clear Stamps Vintage Vanity, Prima Marketing Stencil Harlequin, Golden Molding Paste, Sizzix Bigz Die Love Gears, Cuttlebug Machine V2, Ranger Heat It Craft Tool, Stanley Glue Gun

Tuesday, August 18, 2015

DT PROJECT FOR BEE HAPPY CRAFTS: Flutter


Hi there! I am going to share a set of mixed media cards today. They are of similar composition, but they vary in the layout.

The papers in the Studio Calico sampler pack that came in with the package are all very pretty. It has several green papers which made me think of using green and blue as the main color scheme for this project. For each card, I used a third color—purple, pink and orange. The fourth one was mainly blue.

I used several supplies from the package aside from the paper pack. These include the paper doilies, tags, embossed stickers, buttons and dies.  

Basically, the process is the same for each card. There were just slight variations here and there. I started by making the base using ivory board paper and I cut out the designer papers. I then distressed the edges of the papers except the ones that I used for the 'main background'. The papers from the pack are on the thin side so I needed to adhere them onto pieces of board paper for them to be able to hold the embellishments. Before doing so, I applied molding paste on the papers, let it dry and sprayed glimmer mist on one of them. After which I distressed the edges. I adhered the designer papers onto the base and started decorating. After affixing the embellishments, I brushed some micro pearls mixed with Modge Podge (I don't have a soft gel medium) onto the surface of the flowers. I let it dry then brushed liquid pearl over them. In some instances, I also used metallic acrylic paint to accentuate the embellishments. Also, I placed random crystals to make them more interesting. (Sorry. Can't help it. I just love adding them to my projects!)

Let us take a look at each of the cards.

1. Celebrate


The card measures 5 1/4" x 5 1/4". 


I layered a paper doily, which I first sprayed with glimmer mist, designer paper, die cut and stamped tag before adding in the embellishments.

2. Birthday Wishes


The card measures 4 1/2" x 5 3/4". 


The blue gear was part of a dismantled glue tape.


I stamped on some parts of the card.

3. Congratulations 


The card measures 3 3/4" x 6 1/2".  


For the sentiment, I took one of the stickers from the sticker sheet that came with the package. 


I cut some of the chipboard embellishments which I bought for cheap at the National Book Store Great Warehouse Sale in Quezon Ave. I think I will write a post about the goodies I got from there later this week. And oh, that bottle cap at the bottom was something I picked off the street when I was walking home after my shift. My sister told me that if I wanted to horde bottle caps, I should just ask our neighbor who owns a sari-sari store to give me some. It's rather fun finding little treasures in the street. Heh.

4. Celebrate We Will


The card measures 5 1/4" x 5 1/4".  


I stamped two butterflies on a piece of board paper and fussy cut them then I sprayed glimmer mist. I scored the wings before adhering them on top of each other. And of course I didn't forget the blings!

I had a lot of fun putting together this bunch of cards. I got to play around with my new coloring supplies and explore various techniques. I hope to share some more new projects soon. Thank you for looking today. Have a great week!


MATERIALS AND TOOLS USED: Bevania Splendorgel Board Paper Ivory, kraft paper, Best of Studio Calico Sampler Pack, We R Memory Keepers Embossed Stickers Antique Chic, Rouge de garance Chipboards Passiflore and Valse, tags, paper doily, Eno Greeting Wooden Embellishments, paper flowers, silk rose buds, metal charms, buttons, self-adhesive crystals, bottle cap, string, micro pearls, Golden Molding Paste, The Crafter's Workshop Stencil Mini Art Is, ColorBox Cat's Eye Queue Pigment Ink Dune, Ranger Archival Ink Jet Black, Prima Marketing Clear Stamps Vintage Vanity, Kaisercraft Clear Stamps Butterfly, Happy Birthday Clear Stamps, Ranger Liquid Pearls Hot Cocoa, Mint Green, Peacock, Flamingo, Petal Pink and Cantaloupe, FolkArt Metallic Acrylic Paint Blue Topaz, Modge Podge Classic Matte, Reeves Gesso, Tattered Angels Glimmer Mist Nougat, Bahama Blue and Cinder, My Favorite Things Die-namics Dies Doily Mini Circles, Cuttlebug Machine V2