Tuesday, February 16, 2016

THANK YOU!

Hello! Happy Tuesday! I need to go back to work tonight, but I still have a holiday fever. [Sigh.] I just hope it wouldn't be a tough night.

Anyhow, I am here to share to you several cards and whatnots that I made over the past few weeks as a way of thanking the owner and Design Team Leader of Bee Happy Crafts who was so generous to us for providing such lovely tools and supplies and for appreciating what we do.

I haven't been able to show my gratitude sooner (last October when my third month as a Design Team member ended), but I really wanted to give her a gift (or should I say several gifts) as a token of my gratitude. I just was not able to send them to her sooner. As the saying goes, 'It is better late than never.' Heh. I hope she likes them. Here they are.

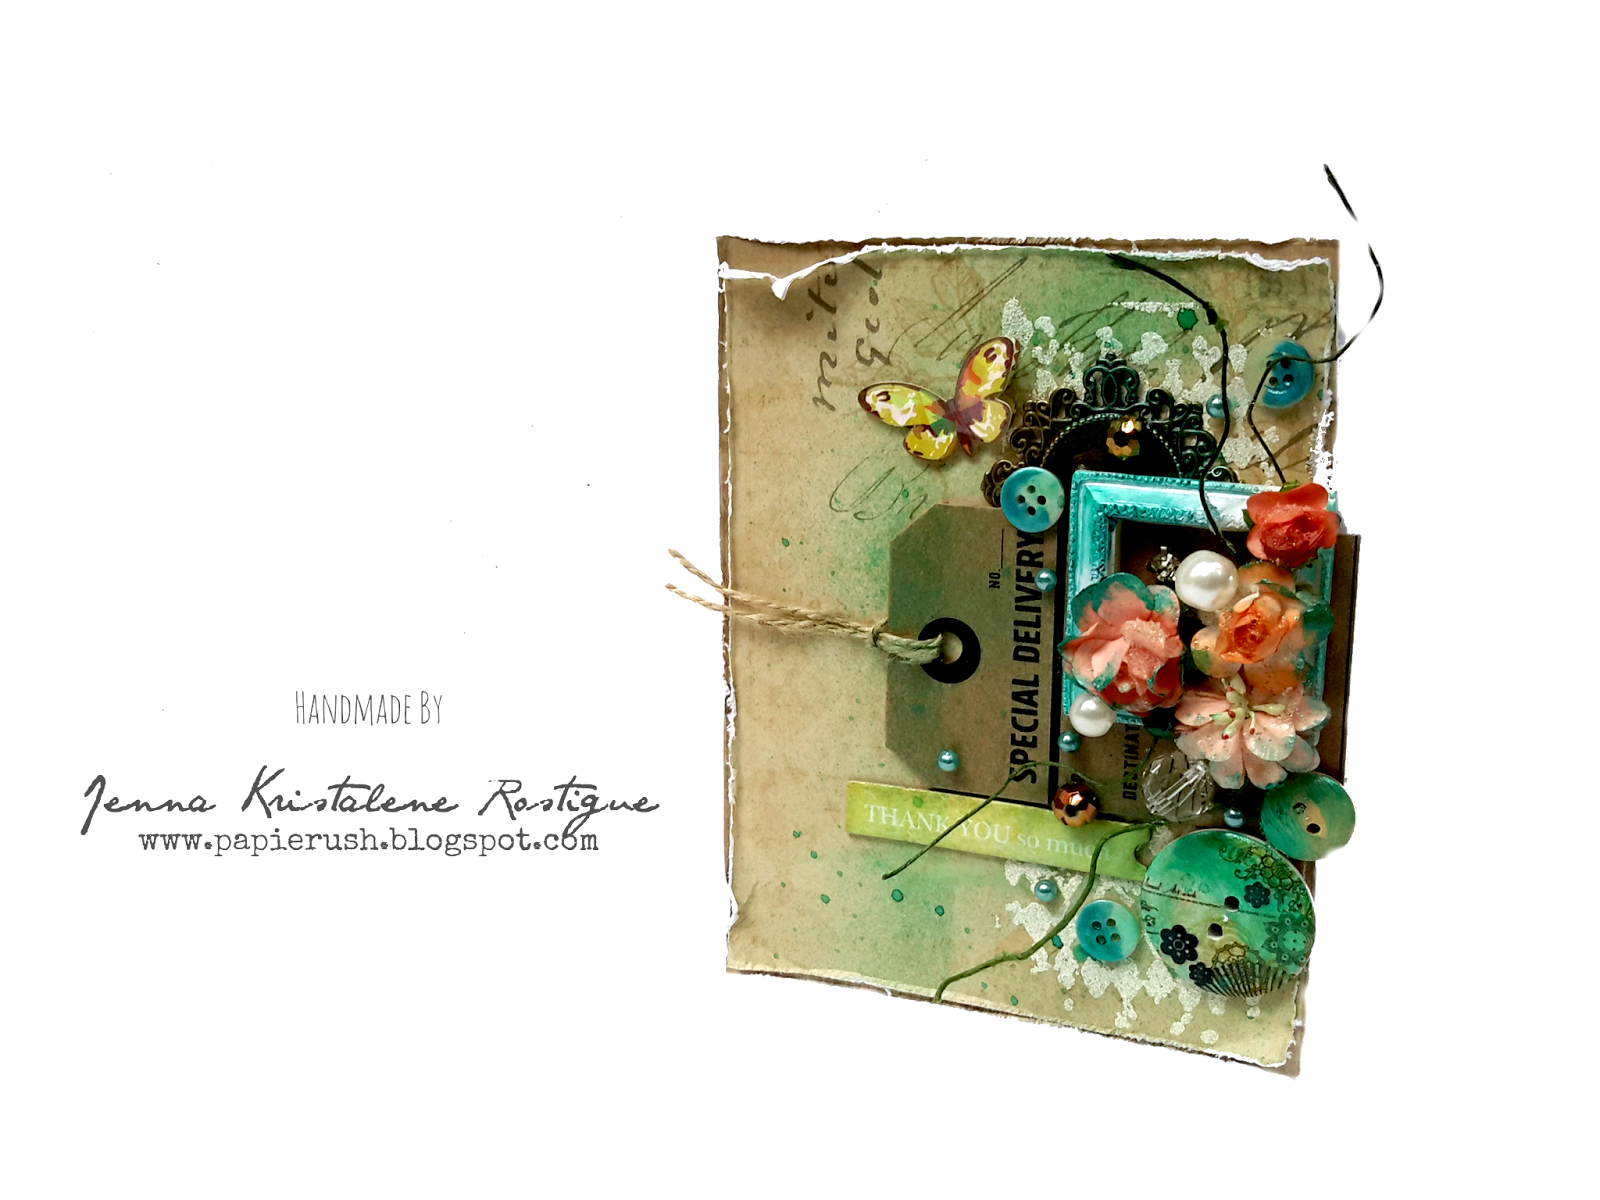
1. Thank You Card
This is not what I had in mind when I was picturing out how the card would look like, but as I was making it, things started to happen. Hah. It was supposed to be orange and blue, but it turned out to be green instead of blue. I can't figure out how that came to be. I still had fun making it though. It is a little bit weird, but I think it is okay.


CARD# HPJ-2016-01: Thank You So Much 


I distressed the papers from the Tim Holtz paper stash. I stamped on the surface and embossed the image using weathered white embossing powder. After which, I adhered the embellishments. I added glass bead medium for texture glazed the embellishments. I sprayed glimmer mist as an afterthought. Voila! There goes my thank you card.

MATERIALS AND TOOLS USED: Bevania Splendorgel White, Eno Greeting 8"x8" paper pad Comfortable Afternoon, Papemelroti Tag, chipboard sticker, Eno Greeting 3D sticker, Eno Greeting resin embellishment, buttons, paper flowers, beads, self-adhesive crystal, Kaisercraft Clear Stamps Diamonds, Ranger Archival Ink Jet Black, Ranger Embossing Powder Weathered White, Ranger Heat It Tool, Tattered Angels Glimmer Mist Bahama Blue, FolkArt Acrylic Paint Emerald Green, Stanley Glue Gun 

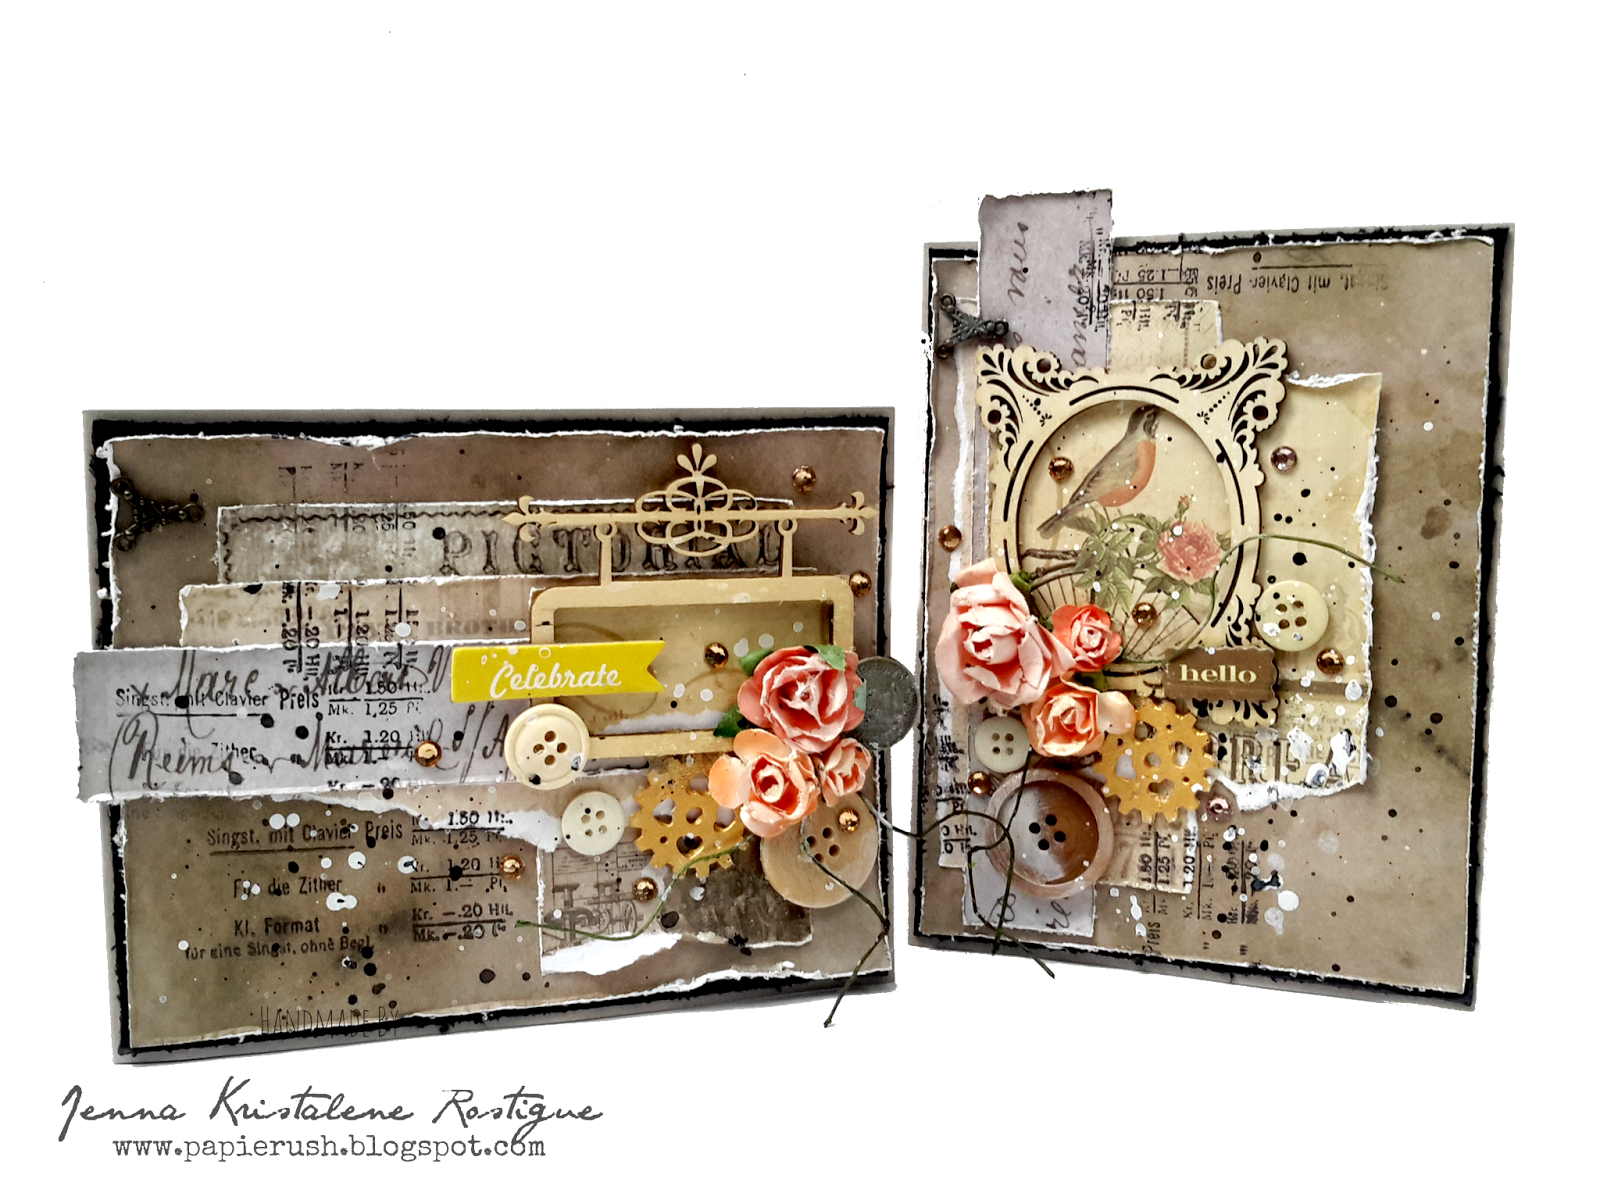
2. Blank Cards
I made a set of blank mixed media cards which she can give to her friends on their birthday or to just say hi. I actually did a little experimenting on these cards. I changed the process which I usually follow when I make mixed media cards. I tried to mimic Elena Morgun's way of making her cards. Her process is great, but I think I will just stick to mine. It felt a little awkward and weird. I am more comfortable with how I do things, but I will definitely use some of her techniques like using chipboard for added dimension and completing the front of the card before adhering it onto the card base. I love her works. I wish I could be half as good as her.
Basically, I made the cards using similar materials. I just changed the layouts and the sentiments.


For each card, I layered several bits of patterned paper and topped it with various embellishments. I splattered some paint over it to make it more interesting and of course I added a couple of crystals because they are one of my staple supplies in making cards. Heh.
CARD# HPJ-2016-02: Hello
CARD# HPJ-2016-03: Celebrate


CARD# HPJ-2016-04: Enjoy


CARD# HPJ-2016-05: Birthday Wishes


MATERIALS AND TOOLS USED: Rives Board Paper Tradition Black, Moods Board Paper Stormy Grey, Tim Holtz Paper Stash 8"x8" Miscellaneous and French Industrial Revolution, printed texts, Eno Greeting Wooden Flourishes, paper flowers, metal charms, beads, self-adhesive crystals, buttons, brads, shrink plastic embellishments, Eno Greeting 3D stickers, Prima Marketing Clear Stamps Vintage Vanity Musica, Bo Bunny Clear Stamps Sentiments, Ranger Archival Ink Jet Black, The Crafter's Worshop Mini Stencil Chicken Wire Reversed, Golden Light Molding Paste, Golden Glass Bead Medium, Golden Soft Gel Medium, Pebeo Gesso, Reeves Acrylic Paint Mars Black, Ranger Embossing Ink Pad, Ranger Embossing Powder Super Fine Black, Ranger Heat It Tool, Stanley Glue Gun

3. Tags
I love how the Christmas tags I made for the Design Team last year turned out and I wanted to use the same principle in making another set. Here is what I came up with. (Sorry for the stenciled part. I must have overheated the molding paste. TT.TT.)


TAG# HPJ-2016-01: Cherish


TAG# HPJ-2016-02: Remember

TAG# HPJ-2016-03: Moments


TAG# HPJ-2016-04: Memories


MATERIALS AND TOOLS USED: DCWV 12"x12" Chalkboard Stack, All About Scrapbooking 12"x12" paper, printed text, Eno Greeting Wooden Flourishes, paper flowers, metal charms, buttons, beads, The Crafter's Workshop Mini Stencils Art Is, Brocade and Chicken Wire Reversed, Prima Marketing Stencil Harlequin, Golden Light Molding Paste, FolkArt Metallic Acrylic Paint Blue Topaz and Pearl White, Ranger Embossing Ink Pad, Prima Marketing Clear Stamps Vintage Vanity Musica, Ranger Embossing Powder Weathered White, Ranger Crackle Paint Rock Candy, Golden Glass Bead Medium, micro pearls, Golden Soft Gel Medium Gloss, Stanley Glue Gun

P.S. For some reason the color of the text would not change to black no matter how many times I try so please bear with it. I'll figure something out later. Also, I have yet to add the paper clips, bookmarks and altered box. I will post them as soon as I finish editing the photos. Thanks for looking today! Have a great week!

Friday, February 12, 2016

CARD# HPJ-2016-06: Vintage Birthday

Hi there! I am going to share a card that I made for a friend and colleague last January. I had a hard time remembering the name of the special fold card. I couldn't recall how it was done so I tried to google it, but of course I need the name of the fold. I went through my folders of video tutorials and text tutorials, but I couldn't find it. So, I went through the gallery of tutorials by Splitcoaststampers because I am positive it could have been Beate Johns or any of the girls who made the tutorial and I was right. I saw a picture of a finished card. Gad. It was called a Criss Cross Card. Ugh. Why didn't I think of that? The flaps overlap each other from both sides so it's 'criss cross'. 

Anyway, from there, I was able to make the base of the card. Mine was 4 7/8" x 4 7/8". Here is what I came up with.


I wanted to go for a vintage look so I inked the papers with Tim Holtz's mini distress ink. I adhered lace on the front of the card to add texture and added a lace trimming over it. I had adhered chipboard at the back of the paper which I used as background for the focal point (a 3d sticker) for dimension before placing it on the card. I punched strips of board paper to decorate the opening of the card. As a finishing touch, I affixed some charms and self-adhesive pearls here and there.


I used a diecut which I made with one of Spellbinders fancy tags as a pull tab for the insert and stamped the sentiment.
The one on the left is the back of the criss cross card.
That was that. I just love how it came out. I enjoyed making it and my friend loved it. I think I will be making more birthday cards using this fold. The finished card is really pretty. It looks complicated, but in reality it is so easy to make. If you would like to try making one, Beate's tutorial will be useful. You can check it out here.

Thanks for looking today! Have a great weekend!

MATERIALS AND TOOLS USED: Bevania Splendorgel Ivory, Eno Greeting 8x8 paper pad Comfortable Afternoon, Eno Greeting 3D Sticker, lace trimmings, self-adhesive pearls, metal charms, Bo Bunny Clear Stamps Sentiments, Ranger Archival Ink Jet Black, Ranger Distress Ink Mini Walnut Stain, Martha Stewart Edge Punch Doily Lace, Spellbinders Shapeabilities Fancy Framed Tags One, Cuttlebug Machine V2


JANUARY CRAFT HAUL

Hello! I thought I posted the supplies I bought last month, but upon checking my previous entries, I wasn't able to see it so here I am writing about it.

I placed another order at Bee Happy Crafts.


Woohoo! I finally have the Vintage Lane Stack! I love the papers. They are just awesome! I would probably use them to cover my future mini albums.

Here are the rest of the supplies.
Pink Paislee Snow Village Kit

 Clear Stamps: Imaginisce Happy Traveler Plane and Scooter, Pebbles Snowman and Snowflake

 Clear Stamps: Kaisercraft Little One and Pink Paislee Merry & Bright


Ranger Archival Ink: Viridian, Aquamarine, Chrome Yellow, Vermillion, Plum and Sepia
Ranger Distress Ink Mini: Antique Linen and Pumice Stone
Ranger Embossing Powder Weathered White

Martha Stewart Punch Elephant and Paper Smooches Wise Dies Baby Shower
Also, I bought a couple of resin embellishments, some more wooden flourishes and 3D stickers.


The haul ends here. Thanks for looking today!

Monday, January 11, 2016

END OF YEAR CRAFT HAUL

Happy New Year! Well, I spent New Year's Day alone in our apartment and I mostly slept through it. Heh. I had to work on New Year's Eve so I didn't get much sleep the previous day. 

Though I had to work, I was able to go home for Christmas Day and by home I meant taking a bus ride all night long from the Metro to my hometown in the North. I was surprised that it took us only 8 hours and 30 minutes. It usually takes 10 or more. That was really fast. I almost didn't get to wake up when I was near my destination. Gad. It was a good thing the bus stopped longer at the usual drop off point after entering our province or else I would have been disturbing my relatives at the wee hours of the night to let me in. (The bus terminal was near their house.)

I spent Christmas Day with my cousins. We went biking in the afternoon. I was pretty exhausted when we got back home so I didn't get to eat dinner. I dozed off as soon as my head hit the pillow.

Oh. By the way, I only had two whole days at home. I needed to go back for work. TT.TT. I hope to have a longer vacation next time and I want to spend New Year's Eve there. We'll see if I could get a leave for that later.

Anyway, on my second day at home, I registered for 24 hours of mobile data so I could upload my projects on Instagram and share them on my Facebook and Tumblr. Lord. The internet connection was soooo slow. I think it was early morning when I placed an order to my favorite craft shop in town Bee Happy Crafts. I told myself I will stop ordering craft tools and supplies last October for a couple of months, but when I checked the site, they had new stocks of archival inks, clear stamps and Spellbinders dies. I definitely had to buy. I don't know when they will have them again. It was still December so it was fine. I will probably make another purchase or two before the month is out because I have yet to have an eyelet setter. Drat. I want a Big Bite, but I'm thinking that the Crop-A-Dile will do. Gah. And then a tag dies. I hope Memory Lane or Which Craft have them. They are out of stock at BHC.

I tried to limit myself to spend about P6,000. It's a long way to go till the next pay date so I must not splurge on other stuff. Here is what I bought with it.

                 1. Ranger Archival Ink Pads: Jet Black, Coffee, Pale Ochre                                                         and Rose Madder

 2. Clear Stamps


 Bo Bunny Clear Stamps Sentiments, Bo Bunny Clear Stamps Geometric Patterns, Kaisercraft Clear Stamps Diamonds, Kaisercraft Clear Stamps Morocco

 
Multi-crafts Clear Stamps Owl Medley, Vintage Tools and Tickets
 Kaisercraft Clear Stamps Words

3. Spellbinders Dies


Labels 17, Labels 34, Labels 4, Labels One and Fancy Lattice

4. Tags


5. Paper Pads

 Eno Greeting 8"x8" paper pad Comfortable Afternoon

[Sigh.] There are still so many things that I need to get to use on my future projects. I'm going to post a wish list on a different page. I will be updating it from time to time. It will also be some sort of tracker if and when I get them.

That was that. I have not started a new project yet, but I am going to work on a couple of things that I would like to give to the Design Team head. And I will try to fix my Cuttlebug while waiting for our landlady to stop by. Thanks for looking today. Have a great week!

RE-STOCK OF WOODEN EMBELLISHMENTS

Hi! My supplies are dwindling. I only have a couple of wooden embellishments left. My buttons are almost gone. I'm running out of lace trimmings and metal charms. Tsk. Tsk. I must go to divi soon, but I have to wait until perhaps the last week of the month or early February because there are still a lot of people shopping there from the holiday craze.

Anyway, before 2015 moved to a close, I was able to grab packs and packs of Eno Greeting Wood Flourishes. Yay! They have re-stocked them at Landmark so I hoarded some. Heh. They will be out in no time if I didn't buy several and I would only regret not taking a lot (at least two packs of each design). Pity they no longer have the 3D stickers. I will definitely buy a lot of them when they have new stocks. Those metal 3D stickers are great for my tags and minis! Now that I am getting addicted to making the hidden hinge paper bag mini, I need loads of them.

Going back to the wood flourishes, here they are.