Monday, December 28, 2015

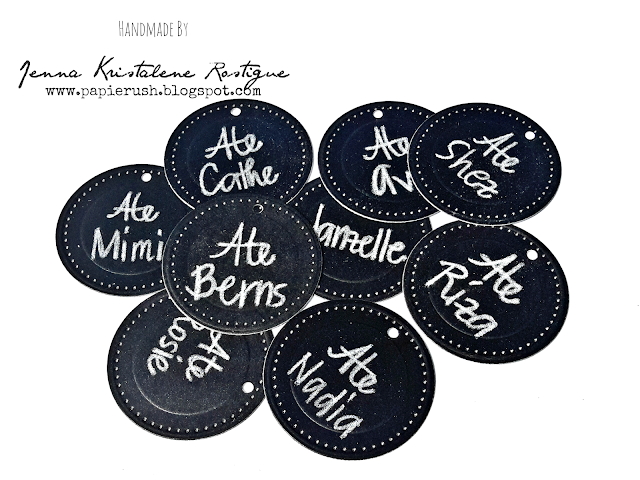
DT PROJECT FOR BEE HAPPY CRAFTS: Pierced Circle Tags

Hi again! Here is another set of tags that I made for the Design Team.
They are simple and very easy to make. I just ran pieces of chalkboard paper through my Cuttlebug using the Spellbinders Pierced Circle die then wrote the names of the recipients on them with a color pencil. I will just add some jump rings on the punched holes before attaching them to the 2-5-7-10 treat boxes. Easy peasy! Why don't you try making them? You'll have a lot of fun.

Thanks for looking! 

MATERIALS AND TOOLS USED: DCWV Chalkboard Stack 12"x12", Spellbinders Nestabilities Pierced Circles, ticket punch, Faber Castell Watercolor Pencil White

DT PROJECT FOR BEE HAPPY CRAFTS: Holiday Treat Boxes

Hello! One of my favorite holiday craft projects is the 2-5-7-10 treat box which I learned from Beate Johns of Splitcoaststampers some time ago. I have made a lot of these over the years, but the ones for this year are a bit more special. It is a DT project I made for BHC and it was in line with my theme Chalkboard Christmas. Basically, the base is black and it has a chalkboard element to it.
You can find Beate's tutorial here.

I punched the edge of the flap of the treat box with Martha Stewart's Edge Punch Floral Lace. This puncher is really pretty.

I threaded a length of gold ribbon which a friend gave me to close the treat box.

Whenever my friends and colleagues buy cakes with ribbons or receive gifts with ribbons, they would always give me the ribbons to me. They know that I horde all kinds of things for my craft projects. Hehe.

 
There is nothing much going on on the treat boxes. I did not put my usual embellishments. Instead, I stamped on some diecuts and smudged the diecuts with soft pastel to make the chalkboard look and adhered them on the front of the boxes. That just completed the box. 


I forgot to singe the tips of the ribbon before taking the photos. If you want to make them and you are planning to use silk ribbon like I did here, don't forget to singe the edges because they would eventually unravel. You don't want all the ribbon to disappear.


When you are done with the boxes, you can put chocolates and small gifts inside. I am going to use these treat boxes to hold several Nestle chocolates and mini notebooks for my friends at my previous job. I hope they like them. See you next time! Thank you for stopping by.

MATERIALS AND TOOLS USED: Prestige Board Paper Zulu Black, Rives Board Paper Tradition Black, Pink Paisley 6"x6" paper pad Merry & Bright and Snow Village, silk ribobn, clear stamp, Tsukineko Brilliance Pigment Ink Pad Moonlight White, Gallery Soft Pastel White, ticket punch, foam tape, Spellbinders Nestabilities Labels Thirty-Five, Cuttlebug Machine V2

DT PROJECT FOR BEE HAPPY CRAFTS: Mini Christmas Treat Bags

Hi again! You already know by now that my theme for the month of October is Chalkboard Christmas. Here is another project for the holidays.


I used the Shimelle True Stories dies to make the little bags. I wrote the sentiment on the banner diecut using a white pigment ink pen and smudged soft pastel on the surface.


And that was that. Easy, right? You can tuck a folded bill there or a pair of earrings.


MATERIALS AND TOOLS USED: Pink Paisley 6x6 paper pad Merry and Bright, DCWV Chalkboard Stack 12"x12", Shimelle True Stories Dies, Signo Broad Pigment Ink Pen 0.7 White, Gallery Soft Pastel White, My Favorite Things Die-namics Mini Doily Circles Dies, Cuttlebug Machine V2

DT PROJECT FOR BEE HAPPY CRAFTS: Card With Box (or Box Card)

Hello! Here is another one of my favorite projects for special occasions. It is a card with a box inside which could hold chocolates, notes and what-not for the recipient. I learned to make this from Arlene Cuevas. I stumbled upon her Youtube channel My Butterfly Kisses a few years ago and saw this tutorial she made for Graphic 45. She called it a card with box. If you are interested, you can find the tutorial here and you can find the walkthrough of the finished project here.

Here is what I came up with for the DT.


I used papers from the Echo Park reflections 6"x6" paper pad for the background and embellished the front of the card with Graphic 45 flowers, gears metal charms, brads and beads. I cut a small tag from a piece of chalkboard paper and wrote 'JOY' on it.
I made a window on the lid of the box using Spellbinders circle dies and acetate. Sorry for the unevenness. I miscalculated where the holes would be. 
Stuff the box with sweet treats like these Kit Kat Rubies. Delicious!
This is the back of the card. Remember my paper bag minis? I adapted the closure for the minis here. I really don't like tucking the ribbon underneath the patterned paper because I usually forget to do it before adhering the patterned paper onto the base. I would always need to pry the paper away so I can insert the ribbon. Bah. With this closure technique that I learned from Cathy McGrath, the card becomes even prettier with the added filigree and I don't get annoyed with the mistake of adhering the paper before putting in the ribbon. Yay!

MATERIALS AND TOOLS USED: Rives Board Paper Tradition Black, DCWV Chalkboard Stack, Echo Park 6"x6" paper pad Reflections, Pink Paisley 6"x6" paper pad Snow Village, Tim Holtz Paper Stash 12"x12" French Industrial Revolution, acetate, Beauty Premium Pigment Ink Pad Black, Graphic 45 flowers, gears, beads, stamens, metal charms, brads, silk ribbon, Eno Greeting 3D Stickers, chipboard sticker, Faber Castell Watercolor Pencils White, ticket punch, Spellbinders Nestabilities Pierced Circle Dies, Cuttlebug Machine V2